STARGAZING SESSION IN CALIRAYA , LAGUNA |
||
May 7-8, 2005 by Raymund Sarmiento |
||
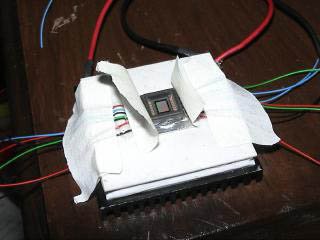
On the day of the Caliraya trip at around 6:30 AM i woke up and decided to prepare the things i need for the stargazing session. It was this time when i got hold of the circuit modified Logitech webcam and had this thought of fixing the hot pixel problem before going to Caliraya. I already have 1.5" x 1.5 inch Peltier module with me which I got hold couple of weeks back from an old 12 volt car refrigerator (it was actually a gift from Citibank after accumulating a certain number of points on their credit card). So for three hours starting at around 7AM on the day of the scheduled Caliraya trip, i decided to add some CCD cooling option on the webcam using the peltier module. It took me 3 hours to cut off the pins of the CCD with a knife blade cutter, dismantle the CCD from the webcam board, glue the CCD on top of a small aluminum plate which is already glued on the cold side of the peltier , glue a small CPU heatsink on the hot side of the peltier, solder 14 colored wires (wires used for wire wrapping) on each of the CCD pins, solder the other end of the wires on the Logitech webcam board.
CCD glued on top of an aluminum plate with plate glued on the peltier module
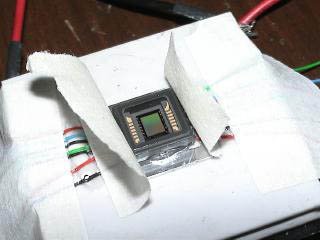
CCD closeup. Masking tape is used to protect the CCD surface from the mighty bond fumes.
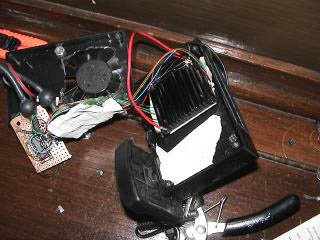
By 10AM everything is in place and i only need to put the assembly back to the plastic alexan circuit box. The box already has a 5V cooling fan attached to it that derives the 5volt power from the USB connector.
Heat Sink glued at the back of the Peltier Module
Webcam Box from an Alexan Circuit Box
I did a couple of tests on the webcam itself and see if the CCD is still working before putting the entire assembly back into the alexan box. Boy was i lucky - there i saw on my computer screen an image with varying intensity. The intensity of the image varies each time i put a small piece of lens cleaning paper on top of the CCD window (a good indication that the CCD is reacting to the shadow of the paper. There is no clear image yet because there is no lens on the CCD. After putting everything back into the box, i tried to check if there is any improvement on the hotpixels while the peltier cooling is on. To activate the 12V peltier, I used a cigarette lighter adaptor that has a DC to DC - 12volt to multiple voltage output. This adaptor was useful in powering the peltier because of a rotary control that varies the output voltage between 1.5 to 12V using the car’s cigarette lighter socket. This adaptor allows me to control the peltier’s cooling temperature. With long exposure mode enabled, and the peltier activated at 6V, I was able to verify from the computer screen an improvement of output image. The peltier did removed most of the hot pixels and there was a significant improvement on the image contrast. The next step is to test the cam on the field itself. It was around 11AM when i concluded the test and decided to load everything in the car.
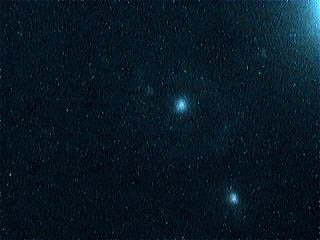
I arrived at Shell Alabang at around 3:30 PM and met Jett there. James and Edgar Ang arrived 30 minutes later. After some brief introductions, we had a couple of discussions with most of the topic related to astronomy of course. James showed this homebuilt Dew Eliminator using 1 watt .47 ohm resistors connected in series. The resistors are then connected to a 12 volt car cigarette lighter connector using speaker wires.. Hmmm… not a single solder was used to connect those components. I was really thinking at that time if these guys really know what they are doing because if any of the hand wound wires fall off during the stargazing session, we might see a display of 12 volt fireworks and melted scope rims - bad for a dark adapted eye :-D. A quick run on Ohm’s law allowed me to compute for the power dissipation and current flow. I need it checked if this setup is within the resistors handling capability. The computation came out well and it fell within the specs of the resistors – whew!. That means no smoke or firework display! LOL We left Shell Alabang at around 4:30PM and proceeded to the Hill Top Resort at Caliraya. It was a pleasant 3 hour ride. There we had the usual dinner (with a slight change on the menu) – too bad the asparagus soup was not available. Prior to our dinner, we decided to check on the homemade Dew eliminator. Jett brought inside the canteen a brand new 2SM Maintenance free car battery. That is the only time I realized that it was Jett who requested for a Dew Eliminator and James’ task was to fabricate one for him. After some quick wiring check, the resistors were wrapped on a black linen tape and connected to the battery. The resistors performed well and we noticed some significant heat build up on the strip but not enough to melt the tape. I see Jett will be having a dew-less night with this setup :-) It was around 9PM when we started setting up our equipment. Same spot where we did our last observation each one of us took some time to setup our scope. We had a clear view of Polaris but noticed some cloud formation at the western horizon. Transparency is good except for some occasional cloud formation mostly on the north/west horizon side. After some quick polar alignment, I decided to check if the 10” scope on the Orion EQ mount if its tracking well. This was done by performing some quick observations on Jupiter using a 9mm Plossl on a Meade 2X Barlow. I added an additional 2.5 lbs of counter weight on the mount (which brings me to a total of 42.5 lbs of counterweights) The scope is not balanced prior to this and this condition was noticed by James during our last Buso session. With the 9mm and 2X barlow, details on Jupiter’s bands were recognizable. I tried to push it more using a 5mm on a 2X barlow (roughly 500X) and saw wisp details on Jupiter’s Equatorial bands plus a couple of cloud formation at the northern and southern part of the planet. I did not notice any shift in tracking during Jupiter’s observation at high magnification. Edgar also had a chance to look at Jupiter using my setup and noticed the band details. After Jupiter, I decided to point the scope to M51 and start testing the peltier cooled webcam. I was actually planning to do some visual observation first before proceeding to the webcam tests but I noticed the cloud formation at the northern part is starting to increase in size. In fact, the polaris was not visible anymore. I chose M51 for this test because I already have an image of it with my air cooled Logitech Webcam. This way I can do some comparisons with the peltier cooled version. In the absence of a computerized GOTO setup, it took me about 6 minutes to locate M51 on my 15mm eyepiece. I’ve tried a few sessions of star hopping before but im not an expert on this yet so it’s the usual point the scope in the general direction of the DSO and do some sweeping movement of scope hoping M51 will land within the eyepiece’s field of view. Some quick visual observation on M51 shows some details on the galaxy’s arms including the one near the companion galaxy. Actual Imaging Tests Without moving the scope, I decided to replace the eyepiece with the webcam and a .63 Mogg Focal reducer and did some 30 second exposure shots while peltier is off. These short exposure shots were necessary in order to allow me to do some focus adjustments before proceeding with the actual long exposure shots. And viola, all I can see are hot pixels but no Galaxy. Hmmm… what could be wrong here ? Wiring problem on the CCD ? Scope was moved out of place ? That was the time I noticed that the general area where M51 is located was already covered with clouds. Arrggh! Probably I spent too much time looking for M51 and mounting the webcam. There you get to feel the advantage of having a GOTO system specially if your aim is to cover more DSOs in one night. At this point, I don’t want to move the scope anymore and decided to wait it out until the cloud cover clears. While waiting, I decided to check on the others and see if they are ok. Jett’s JKTY Dew Heater seems to be working well. Not a single dew on main corrector lens. Hmmm… James should start a manufacturing business for this and sell this to potential clients like Joel :) It was already past 1 AM when the clouds started to clear out. There, I wasted no time in getting those shots. I did a couple of short exposure shot first and tried to adjust the focus in between shots until I get an optimum focus. After getting the correct focus, I decided to activate the peltier by plugging the adaptor to my car’s cigarette lighter and adjusted the voltage settings to 6 volts. I waited for 2 minutes to allow the peltier module cool down before taking a couple of long exposure shots. I Initially set K3CCD to do a 80 second exposure and viola, minimal hot pixels ! but faint M51 ! Hmmm.. What could be wrong here ? I decided to increase to the exposure 120 seconds, and still image is faint. Arrghh, what could be wrong here ? There is no cloud cover naman but still the I am getting a faint image even if I increase the exposure to 150 seconds. At this time, James came and was checking my progress on the webcam test. He also noticed the faint image shot im getting even at longer exposures. Hmmm, dew on the CCD ? Just to confirm we decided to remove the webcam assembly from the scope’s focuser and tried to check on the CCD chip. And there it is, CCD is iced/dewed up because of the peltier cooling. After some analysis on the setup, the CCD chamber is not sealed and is still exposed sa air and the cold and hot side of the peltier module still resides on the same chamber space within the plastic alexan box. Both sides should have been sealed from each other thus preventing any temperature feedback. Since I don’t have the time to fix this and the battery of notebook is already depleted, I decided to save what was imaged and proceed with the visual observation.
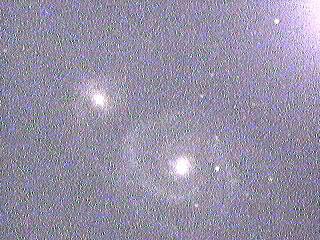
Webcam image of M51 without Peltier cooling (80 seconds exposure)
Webcam image of M51 with Peltier cooling (120 seconds exposure -faint image caused by dew/ice buildup on the CCD):
DSOs and star objects that were observed were M104 (sombrero galaxy), M4, the M8 Lagoon Nebula, and the Alpha Centauri binary star system., I was with James when he decided lend me a 2 inch 200 USD ++ nebula filter while observing the Lagoon Nebula. Mounting James’s filter on my 2” 32 mm Astrola wide field plossl, the filter did brought out the nebulosity details of M8 and the image was spectacular. It was already 4AM when I decided to have a quick nap. James and Jett still continued with their usual imaging while their scopes are enjoying the comfort and warmth emanating from their car battery powered dew heaters. I woke up at 5:30 AM and that was the time James decided to have the usual ALP photo shoot. After the shoot, we packed our equipment and had our usual American style breakfast. I left the place at around 7AM while James, Jett, and Edgar took some time to rest in a rented room before going back to Manila. The webcam test on the field really was a fulfilling experience. I get to take notes of the results that I can use to solve those problems encountered during the session. Also with the group’s Dew heater innovation, we have proven that quality observation/imaging can still be achieved using local components and with the least possible drain on our wallets :-)
|
||
|
For Comments jkty@astroleaguephils.org |
